The two most common mistakes in a van build are buying too little battery and running flat by morning, or buying too much solar and wasting money on panels that never charge what you can store. This guide walks you through both calculations using real measurements from my own builds.
By the end you will know exactly how big your battery should be and how many watts of solar you need to keep it topped up in your climate.
What this guide covers
Work out your daily power use
Every item in your van draws power. Some draw a tiny trickle all day. Others pull a massive amount for just a few minutes. Add them all up and you get your daily Ah figure, which drives everything else.
The formula is simple: Amps × Hours = Ah per day. For appliances that run in minutes rather than hours, divide the minutes by 60 first.
Everyday appliances
| Appliance | Draw (amps) | Daily use | Daily Ah | Notes |
|---|---|---|---|---|
| 12V fridge (medium) | 3–5A average | 24h cycling | 40–60Ah | Biggest ongoing draw in most vans |
| LED strip lights (main) | 4A | 4 hours | ~16Ah | Individual strips typically 1A each |
| Laptop | 3–5A | 3–5 hours | 9–25Ah | Varies by model and screen brightness |
| Phone charging | 1–2A | 2–3 hours | 2–6Ah | Almost negligible |
| Fan — Sirocco II (summer) | 0.35A | 8 hours | ~3Ah | Sirocco II is very efficient. Other 12V fans vary widely — check your model. |
| CCTV cameras | 1–2A | 24 hours | 24–48Ah | Running overnight adds up fast |
| Inverter (standby) | 1–2A | While switched on | Varies | Turn it off when not in use |
| Water pump | 5–8A | Short bursts only | 2–5Ah | Only runs when taps are open |
High-draw appliances (through the inverter)
These pull a lot of current for a short time. They run through an inverter, which converts your 12V battery to 240V (AU) or 120V (US). Because inverters are not 100% efficient, the draw at the battery is always higher than the appliance wattage suggests.
The values below are real measurements from my van, not estimates.
| Appliance | Draw at battery | Typical session | Ah per session | Notes |
|---|---|---|---|---|
| Small air fryer | ~70A | 20 minutes | ~23Ah | Hits the battery hard but it is over quickly |
| Microwave (800W) | ~120A | 5 minutes | ~10Ah | Huge draw while running, but short |
| Coffee machine | Jumps around | 3–5 minutes | ~10–15Ah | Draw varies a lot. Budget 10Ah per brew to be safe. |
| Hot water system | Depends on system | 1–2 hours to heat | ~27Ah per cycle | Once hot it holds temperature for hours |
| Hair dryer | ~150A+ | 5–10 minutes | 12–25Ah | One of the heaviest possible draws. Needs big battery. |
Add it all up
Here is what a full day of cooking and working in the van looks like:
| Appliance | Daily Ah |
|---|---|
| 12V fridge | 50Ah |
| LED strip lights (4h) | 16Ah |
| Laptop (4h) | 16Ah |
| Phone charging | 4Ah |
| Air fryer (1 session) | 23Ah |
| Microwave 800W (1 session, 5 min) | 10Ah |
| Coffee machine (2 coffees) | 20Ah |
| Hot water (1 cycle) | 27Ah |
| Sirocco Fan II (8h, summer) | 3Ah |
| Total | ~169Ah |
That is a heavy day with full cooking. A simpler day, no hot water and no air fryer and cooler weather, might be 80–100Ah. Work out your own typical day and use that as your daily Ah target.
Size your battery
LiFePO4 batteries can be used to 80–100% of their rated capacity. Lead-acid can only go to 50% before damage sets in. This guide assumes LiFePO4, which is what almost everyone building a van is using now.
The basic rule: your battery should be at least 1.5x your daily Ah. Ideally 2x. That buffer covers cloudy days, heavier use days, and cold nights where the battery delivers a little less than rated.
| Daily use | Minimum battery | Recommended battery | Typical setup |
|---|---|---|---|
| 50–80Ah | 100Ah | 100–200Ah | Fridge, lights, phone. No cooking appliances. |
| 80–120Ah | 200Ah | 200Ah | Fridge, lights, laptop, occasional coffee. |
| 120–180Ah | 200Ah | 300Ah | Full kitchen, hot water, fan in summer. |
| 180Ah+ | 300Ah | 400Ah | Everything including microwave, CCTV, hair dryer. |
Size your solar
Solar output depends on panel wattage, hours of usable sunlight, and how clean and unshaded your panels are. In practice, panels rarely hit their rated wattage in real conditions.
To convert panel watts to amps: Watts ÷ 12 = Amps. A 200W panel in full sun produces about 16–17A. But that only flows when the sun is directly on the panel. In summer you might get 5–6 hours of useful sun per day. In winter, or on overcast days, that can drop to 2–3 hours or less.
| Panel setup | Peak amps | Summer daily (5–6h sun) | Winter daily (2–3h sun) | Notes |
|---|---|---|---|---|
| 1 × 100W | ~8A | ~40–48Ah | ~16–24Ah | Minimal. Covers fridge and lights only. |
| 1 × 200W | ~16A | ~80–96Ah | ~32–48Ah | Good starting point. Pairs well with 100Ah battery. |
| 2 × 200W | ~32A | ~160–192Ah | ~64–96Ah | Covers most builds. Strong for a 200Ah battery. |
| 3 × 160W flexible | ~40A rated | ~50–80Ah actual | ~25–40Ah | Flexible panels run hot and underperform their rating. |
| 1 × 440W house panel | ~36A | ~125–150Ah | ~50–75Ah | Powerful but very large. See notes below. |
| 2 × 440W house panels | ~72A | ~250–360Ah | ~100–180Ah | Overkill for most vans. Only works on a large flat roof. |
Real solar output from my builds
Rather than guessing, here is what I measured across three different solar setups on my own van over two years.
First build — three 160W flexible panels glued to the roof. ~13Ah on a good summer day. Not enough once I added cooking and laptop use.

Second build — switched to rigid panels, then upgraded to a 440W house panel. ~25A constant on a sunny summer day.
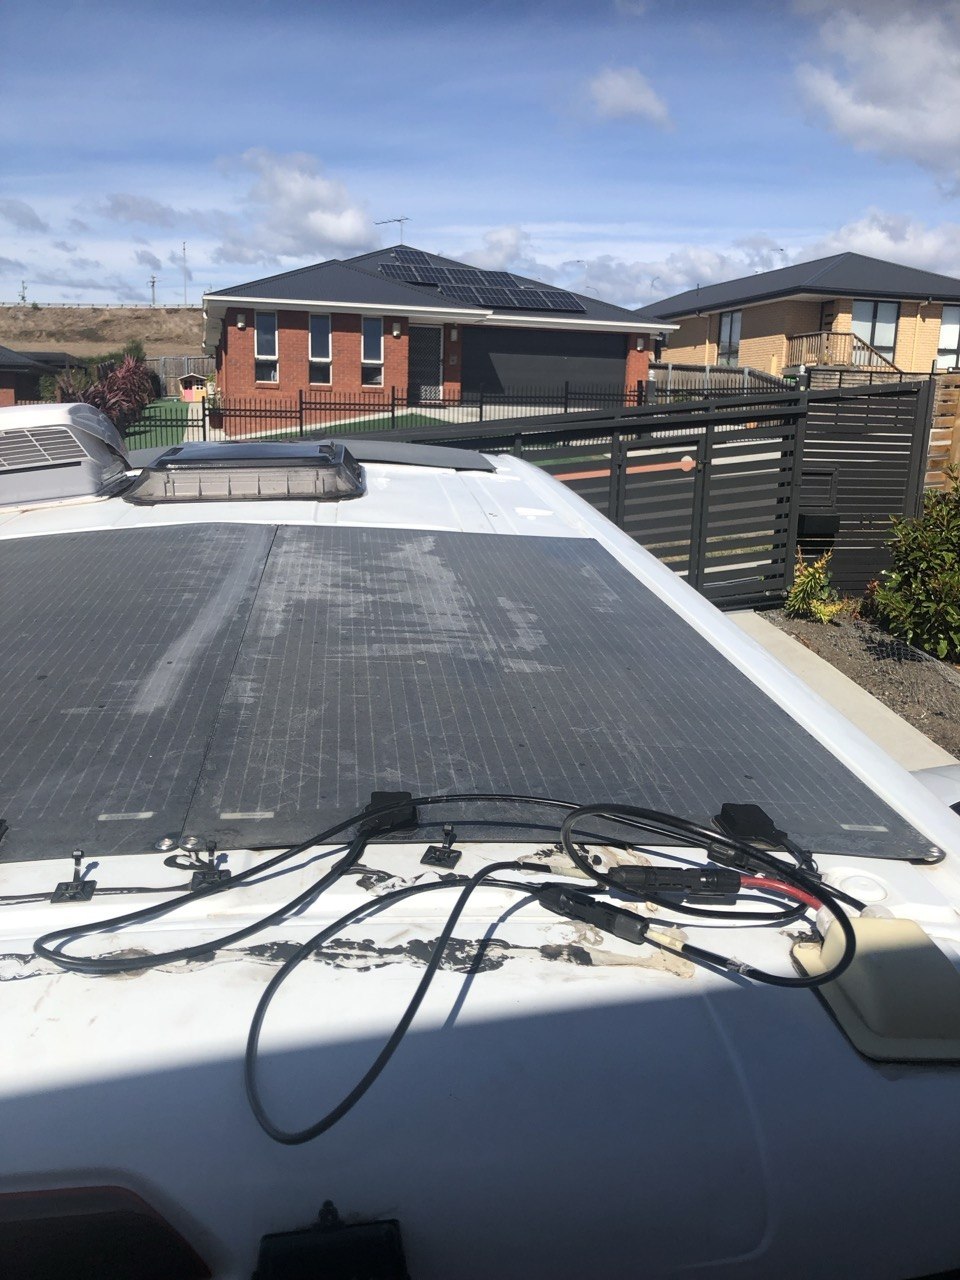
Build 1 — 3 × 160W flexible panels (480W total)
Three 160W flexible panels glued directly to the roof. On a good sunny summer day these produced around 13Ah. That sounds very low for 480W of rated panel, but flexible panels run significantly hotter than rigid ones, and heat kills efficiency. The roof surface also absorbs heat and conducts it up into the panels.
It was enough to keep the fridge running and charge phones. The moment I added a laptop and evening lights, I was relying on driving to keep up. I eventually removed them and moved to a large panel upgrade.
Build 2 — 1 × 440W house panel (~25A constant on a sunny day)
One 440W house panel. On a clear sunny summer day this produced a constant ~25A. Over a long day that is 125–150Ah, enough to cover a full day of fridge, lights, laptop and one cooking session without any driving.
For a first build, purpose-built 12V panels like the Renogy 200W are a better fit than house panels. They are designed for vehicle use, handle vibration properly, and two fit neatly side by side on most van roofs.
Build 3 — 2 × 440W house panels (~50Ah on a sunny day)
Two house panels side by side. On a good summer day, around ~50Ah. At this point the MPPT was throttling output by midday because the battery was already full. It showed me that matching solar to battery capacity matters just as much as raw wattage. There is no point producing more than you can store.
Scenarios: weekend to full-time
Quick getaways, back home to charge
1–2 nights off-grid, drives home between trips
- Battery: 100Ah
- Solar: 1 × 200W
- Fridge, lights, phone, laptop
- Good for 1–2 nights easily
- Avoid microwave and air fryer on this setup
- Driving keeps the battery topped up
1–2 weeks at a time, mixed use
Regular trips, some cooking, some remote camping
- Battery: 200Ah
- Solar: 2 × 200W
- Fridge, lights, laptop, fan, coffee
- Air fryer or hot water fine in moderation
- Add a DC-DC charger for driving top-ups
- Winter: may need to drive more or park in sun
Van is your only home
Living and working from the van indefinitely
- Battery: 300–400Ah
- Solar: 400W+
- Full kitchen: fridge, air fryer, hot water, coffee
- Laptop all day, CCTV overnight, fan in summer
- DC-DC charger essential
- Winter: shore power at campgrounds is worth having as a backup
Recommended setups
Based on the scenarios above, here are the setups I recommend. All Renogy batteries below are LiFePO4 with a 10-year warranty and built for 12V off-grid systems.
Affiliate links: if you buy through these I earn a small commission at no extra cost to you. The price you pay is the same either way.
Weekend setup — 100Ah battery + 200W solar
Renogy 100Ah LiFePO4 + Renogy 200W Rigid Panel
A clean, affordable starting setup. The 100Ah battery handles a fridge, lights and phone for a night easily. The 200W panel keeps it topped up during the day. Add a DC-DC charger and driving will keep you going indefinitely across weekends.
For a slightly smaller budget, the Core Mini 100Ah ($307.99 US / $430.19 AU) includes a free battery monitor and is more compact than the standard range.
Part-time setup — 200Ah battery + 2 × 200W solar
Renogy 200Ah LiFePO4 + 2 × Renogy 200W Rigid Panels
The most popular van setup. Covers a full week of van life including cooking. Two 200W rigid panels fit side by side on most Transit, Sprinter and Promaster roofs. The 200Ah battery gives you a solid full-day buffer so you are not watching the monitor every hour.
Full-time setup — 300Ah battery + 400W+ solar
Renogy 300Ah LiFePO4 + 400W+ Solar
For permanent van living. The 300Ah handles full kitchen use, CCTV, fan and hot water without constantly watching the percentage. The self-heating version is worth it if you travel in cold climates, as LiFePO4 should not be charged below 0°C without protection. Pair it with two 200W panels as a minimum.
The short version
Match battery to use. Match solar to battery.
Work out how many Ah you use in a day. Size your battery to at least 1.5x that, ideally 2x. Then size your solar to replace a full day of use across the hours of sun you actually get. Add a DC-DC charger so driving tops up whatever solar misses.
Start with 200Ah and 400W of solar if you are unsure. It covers most people most of the time, and you can always add more battery or panels later as you learn your actual usage.
See the full electrical build guide ↗